Saturday, March 11, 2017

WeDoTDD.com has Launched!!!


On August 24, 2016, I launched an awesome new website WeDoTDD.com.  


It took me 10 sold months of very hard work (without pay) to both code and hold initial Google Hangout interviews with industry leading programmers and companies who TDD every day..it's their bread and butter.  The outcome is WeDoTDD.com which I'm very proud of and happy that it's out there to promote and help people learn about Test Driven Development.  I'm still heavily working on it, with a list of new features I'd like to add in 2017 as well as continue to grow the list of companies.

The site lists teams that truly practice disciplined Test Driven Development and stories behind exactly how they do that, benefits, and a lot of useful information behind each team and company and to how it's been a success for them and their end users or clients.


Amongst some of the greats interviewed include:


  • Uncle Bob Martin of CleanCoders.com
  • James Grenning, who Wrote the Test Driven Development for Embedded C book
  • J.B. Rainsberger, who wrote JUnit Test Recipes
  • Pivotal, who has been practicing TDD since 1999 and is helping companies such as AllState and Bosch transform their development teams to disciplined XP/TDD shops
  • Menlo Innovations, who has been doing TDD for over 15 years, and has trained many developers on TDD in Michigan
  • Pillar Technology, who has also been doing TDD for a very long time
  • promptworks, whose CEO and team was trained by Uncle Bob Martin on TDD
  • Codesai, whose CEO wrote the first TDD book for Spanish readers
  • Codurance, who has a huge influence in the Software Craftsmanship community in London, as well as helps spread TDD and other XP principals and practices to its many clients
  • CJ Affiliate, who just recently sponsored the Software Craftsmanship conference in Los Angeles and whose teams also practice disciplined TDD
  • Cucumber, the BDD framework by Seb Rose whose teams practices TDD
  • and many more great interviews up there and many more to come 
    • We have over 30 companies in queue taking the interview as we speak, just waiting for them to complete theirs so that we can list them on the site!  The list just keeps on growing
These companies continue to help others adopt TDD by pair programming with other developers and their clients.  TDD is flat out continuing to influence and grow in our industry.  Finally some real uses cases to prove it.

The time for debating TDD is over.  The proof is here, it's being practiced, and it's growing.  We no longer need to be producing studies, there is just too much proof that it's working, more and more companies are adopting it, etc.


More about the goals and purpose of the site can be read here.

Monday, February 15, 2016

Watch Those YouTube Programming Videos Faster!


I wasn't aware of VLC media player, I'm sure it's been around a long time but a few days ago I was having a conversation with another dev around watching videos and he mentioned that he watches videos faster by speeding them up.

I never really thought about doing something like that.  I mean it seems so obvious of a thing to do, and would save me so much time as a developer.

So now I watch videos on code much faster with VLC.  You can stream in any video from YouTube or other sources and speed up the video so those presentations can take 1/4 or 1/2 the time to listen to now.

What I like about VLC is the interface an menu is so simple and straight forward to use too.

Here's how to do it
  • Install VLC and open it
  • From the file menu go to Open Network and paste in a youtube vid url

  • After it opens, go to PlayBack in the file menu and increase the speed!  Awesome!


Save yourself a lot of time and use VLC.

Monday, February 1, 2016

Setting up OBS with Audio Output in Mac OS X


OBS (Open Broadcast Software) is a free streaming software option used for streaming stuff on twitch.tv and a slew of other sites out there.

I'm using SoundFlower for a bunch of different things like recording streaming music, and also for streaming audio playing through my desktop to twitch.tv and other live coding stream sites.

Here is how to setup OBS to stream audio playing on my MacBook pro.  So if you're on a site like livecoding.tv or similar situation where you are streaming and want to share audio you are playing you can.

1) Install SoundFlower which is now on GitHub as a new guy took it over so that's where you can get the installs now
2) Open Audio MIDI Setup on the Mac OS X
3) Add a new aggregate device and select Built-in microphone and Soundflower (2ch)

4) Add a new Multi-Output Device and select Built-in Output and Soundflower (2ch) and change master device to Soundflower (2ch).
(Note: If you don't select Built-in Output then you're not going to hear a thing through your speakers or headphones.)

5) Open OBS and go to Settings and in the Audio section select Soundflower (2ch) as your Desktop Audio Device and set Mic/Auxiliary Audio Device to your Built-in Microphone or if you're using an external mic, select that.

6) Open sound and set the output to Multi-Output Device
Now just start a recording to verify it's working before you start to stream live and the mp4 that's created locally should now be playing whatever audio you were streaming.


Here's a YouTube vid showing it actually does work that I recorded.

Saturday, December 26, 2015

Installing the AWS CLI - Short Version


Once again, this is a very quick and dirty shortened version of their docs.  A lot of this is straight from AWS docs but I've cut out all the clutter and documented how to make the install go smoothly as there are some errors you'll probably most likely run into.

I'm using the AWS CLI for working with/communicating to the Amazon EC2 Container Service so that I can start to create docker images and containers in order to push to my EC2 Virtual Server.


Installing AWS CLI

Verify Python is installed

Type python --version at the command-line

if it's not installed I have homebrew  so I installed it with brew install python

Verify Pip is installed

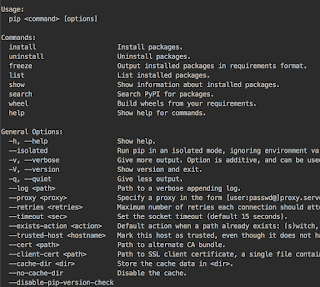
Type pip --help at the command-line

you should see this:


if not, then install it with sudo easy install pip

Install the AWS CLI using Pip

Type sudo -H pip install awscli --ignore-installed six at the command-line

Notice 2 things:
  • added the -H or else you'll get a permission error like this:         
  • added --ignore-installed six at the end because there's a bug with the aws cli install in that aws tries to uninstall six (python) which is already installed in OS X EL Captain so when aws tries to uninstall it (in order to install it), it blows up due to permission errors to those files it's trying to uninstall six 

Verify AWS CLI Installed Properly

Type aws help.  

You should see this (type Q to get out):


Monday, December 21, 2015

Setting up Amazon EC2 Tools for Docker in OS X - Short Version

From Amazon Docs: Amazon EC2 Container Registry (ECR) is a fully-managed Docker container registry that makes it easy for developers to store, manage, and deploy Docker container images.

The EC2 Tools therefore allow you to interact with the EC2 API though your terminal through a special set of bash commands for EC2.  I'm then going to be deploying a new personal site to Amazon via Docker Container to my virtual AWS Ubuntu server via the Amazon EC2 Container Registry.

This is a very quick and dirty shortened version of their docs.  A lot of this is straight from AWS docs but I've cut out all the clutter and more importantly also added a little more about the IAM user creation where I include some screen shots because if you don't give the user permissions, you won't be able to authenticate when EC2 tries to make calls on behalf of your user's AWS Key & Secret.

Download the EC2 Tools
Run this in terminal:
curl -O http://s3.amazonaws.com/ec2-downloads/ec2-api-tools.zip

Extract the Tools
I extracted them here but you don't have to to it here necessarily:
sudo unzip ec2-api-tools.zip -d /usr/local/ec2

Install Java
First verify if you have Java Installed or not:
which java
If it's present you'll see:
/usr/bin/java
If not then install Java.

Set Environment Variables

$JAVA_HOME 
This will allow EC2 to find your java install location

First, manually set it
We will manually set it by running it explicitly in terminal.  But..after this it'll be in your bash profile so you no longer have to worry about manually setting it anymore:
export JAVA_HOME=$(/usr/libexec/java_home)
(when this environment variable is accessed, the /usr/libexec/java_home will return the filepath to the java install on the fly.  If you want, try it out yourself, jsut run /usr/libexec/java_home in terminal)

Set the environment variable in your bash_profile
Set it in your .bash_profile so that it sets it on startup every time.  
Open your bash profile in /users/[yourusername]/.bash_profile
Now paste that export JAVA_HOME line above in your bash_profile

Test the Environment Variable
Now close your terminal then re-open it and run this to verify that the environment variable is working:
$JAVA_HOME/bin/java -version
it should return its version info, example:
java version "1.7.0_55"
OpenJDK Runtime Environment (IcedTea6 2.4.7) (7u55-2.4.7-1ubuntu0.12.04.2)
OpenJDK 64-Bit Server VM (build 24.51-b03, mixed mode)

$EC2_HOME
This variable specifies where the installation of the CLI tools lie.

Manually Set it
To set it, put in the path to the folder where you extracted the tools tool earlier:
export EC2_HOME=/usr/local/ec2/ec2-api-tools-0.0.0.0 
(if you extracted it somewhere else, change the path above.  Replace the 0.0.0.0 with your version of the CLI tools)

Set the environment variable in your bash_profile
also, copy that line to your .bash_profile

Replace your $PATH variable in your .bash_profile with this line:
export PATH=$PATH:$EC2_HOME/bin

$AWS_ACCESS_KEY, $AWS_SECRET_KEY
We need to tell AWS how we're going to authenticate calls when we use EC2 tools.

Create a new IAM User
First, create a new IAM user account if you don't have one where you know the key and secret for it.

Click on your profile and select Security Credentials. 


Copy the Key and Secret and also download the file that contains that for future reference


Be sure that the user also has a policy set 
(note: you can also setup groups) 

Your users must have appropriate permissions in order to auth API wrapper calls you make from OS X terminal to the Amazon EC2 API or AWS API, ect.  

Click on users, and then click attach policy and then select the Administrator policy for your user:


Explicitly Set them
Now go back to your terminal to set the AWS_ACCESS_KEY and AWS_ACCESS_SECRET environment variables by running this in terminal:

use the access key and secret key from the user you created above below
export AWS_ACCESS_KEY=your-aws-access-key-id
export AWS_SECRET_KEY=your-aws-secret-key

Set the environment variables in your bash_profile
copy and paste those 2 lines into your bash_profile.

Verify the CLI Tools Work

verify it works by running a command, so run this:
ec2-describe-regions
you should then see this:


Here's what your .bash_profile should look like
example (I've x'd out my real key values for the sake of this blog post):


Thursday, September 3, 2015

Testing the Koa.js Response Context through koa-controller


Today I was test driving some new endpoints for my Node.js REST API.  I decide it was time to add koa-controller so that I could manage routes better and also map them to controller actions.

koa.js

I'm using koa.js for building out our new REST API in Node.js.

koa uses generator functions.  When you create a koa route, like anything, you can grab the request context and set the response context.

koa-controller

koa-controller adds in support for matching routes with controllers and actions.

A koa-controller receives the koa request context and then in your controller action, you can process the context.  And then set the context's response data, etc which koa uses to send back the http response.

With this middleware, I had created an initial action function as so in my controller:

(I apologize for shitty blogger and the lack of formatting below.  I'm working on moving this blog to some other platform)

module.exports = {
    find: function *(){
        var response = this;
        response.statusCode = 200;

        _gateway.find(function(foundData){
            if(!foundData || Object.keys(foundData).length === 0){
                response.body = null;
                response.statusCode = 204;
            }

            response.body = foundData;
        });
    }
};

problem is, how can my test get back the koa context to test whether my controller did what it was supposed to?  Right now, koa-controller passes back the context automatically.  But I wanna catch it for testing in my unit tests.

You can't just do a return response and we want to keep our functions async anyway and use callbacks (ideally promises) along with generators not because "it's cool"...but because it's necessary and also required by koa in the first place to be using generators for this.

Technically I should mock the koa context because I'm not testing koa; I wanna be testing  the logic I wrote in my controller only.  That'll be next.  But I wanted to figure out how I'd get the context back regardless first.

Generator Functions Save the Day

Since my action function has to be a generator function for koa-controller, that means I could use yield to return the context if I'd like.

That also meant making my callback function a generator or else this wasn't gonna work.

So here it is with yield and the callback generator function

module.exports = {
    find: function *(){
        var response = this;
        response.statusCode = 200;

        _gateway.find(function*(foundData){
            if(!foundData || Object.keys(foundData).length === 0){
                response.body = null;
                response.statusCode = 204;
            }

            response.body = foundData;

            yield Object.create(response);
        });
    }
};

notice I simply added * to _gateway.find's callback function.

Now you're probably wondering why I created another object here instead of just doing a yield response; 

Well koa-controller is handling returning the koa context so when I tried that, it was conflicting with koa-controller core code.  

So what I had to do is simply clone the context and return it.  Now it's independent of whatever process was handling the real context prior to this.

My Mocha.js Test

I use mocha.js for my BDD.

So now I can can test the context's values that came back from the controller's find action function:

it('should return no country when no country exists', function(done){
    var countries = {};
    countryMockGateway.setCountries(countries);
    countryController.gateway(countryMockGateway);

    var koaResponseContext = countryController.find().next().value;

    should.not.exist(koaResponseContext.body);
    koaResponseContext.statusCode.should.equal(204);
    done();
});

ES5

With ES5, you can easily clone which was very hard to do prior with simply Object.create().

So the next time your architect tells you "We don't need to be using new stuff like ES6, that's overboard", you can tell him he's full of garbage.  I didn't have an architect who did that where I"m working but I have in the past.  So here's a good use case for testing and using generators and cloning to easily accomplish what would have probably been a tangled mess of code to do the same thing prior to ES5.

Thursday, June 11, 2015

Killing Stupid Keychain Prompts in OS X


One of the worst things Apple has done in OS X was to create what's called the Keychain.  The intention is that it's a password manager app integrated inside OS X.  If you can help it do not turn this on when initially installing OS X, choose not to use it.  I believe you might need to use it for mobile development I don't know but at all costs if you don't have to do not use this garbage.

But if you do turn it on, you will eventually at some point come across pains with it.  

Specifically you'll eventually get to a point where you'll change your OS X password or domain password or something like that which will cause keychain to throw fits because KeyChain gets out of sync with your new password and still maintains the old password so it throws up at you every time you log in with prompts like these below, forcing you to still input your old password:


So I was literally having to input my OLD password 5 times every time I came into work and logged into Yosemite.  At a certain point, you go crazy and want to resolve this.  Well it's not that easy unless you find the perfect combination of threads out there that allows you to keep Keychain at peace and I feel I've found that combo.

Here's what I did to resolve this Garbage.  If Steve Jobs was here today, I'd hit him on the head for creating such garbage in OS X.  Otherwise I love OS X.

Change your Keychain Core Password

  • Command + space opens up the spotlight search.  Type keychain, and open keychain access
  • Go to Edit | "Change Password for Keychain Login" and most likely it's still using your old OS X login password.  Change it to reflect the current password if you recently changed your OS X / domain password

This doesn't resolve the problem yet though.  One would think it should but it doesn't.  Now proceed to the next step.

Delete the Keychain Folder


Per this article, delete your keychain folder.  
  • Command + Shift + G to bring up the goto folder/file prompt
  • Type in ~/Library/Keychains/
  • Delete your keychains folder, yours will be different.  See my screenshot:

  • Restart OS X
Then cross your fingers that it stays put and stops bugging you.  So far it's been working for me.

Friday, May 22, 2015

Example User Stories with Gherkin - the start of the BDD process


First, I recommend you to read about BDD.  The point of this post is to show you variations in user stories that use Gherkin as the basis to name the feature and write the scenarios (Acceptance Criteria).

I do BDD on everything I code now.  It just works too well and makes too much sense because it guides you and also everyone understands what work is to be done, and what business requirements are expected of the developer.

Gherkin is usually written by product owners in Agile Stories.  And companies do do this, and they do like it a lot contrary to popular belief that nobody uses BDD, and PMs or business people won't do it.   That "won't do it" debate is when companies try to have the PMs or QA do the actual BDD code.  That's not what we're talking about here and that's not the right way to go about it.  No wonder there is so much confusion out there.  If you have QA doing your BDD code or PMs doing the BDD code, sorry to tell ya but your doing it all wrong and that's the source of frustration and the anti-BDD ranting posts out there.

What you do is you have your PMs or business owners write the Gherkin.  If for some reason you're doing something like I had to this week at work which is a few stories that just relate to my own setup environment, I write the Gherkin myself in some stories I just create for me.

I just wanted to share them, in hopes that it helps you understand how to start off doing BDD and how you can write good maintainable, and clear user stories for all.

For the stories that do require code for Gherkin, then developers will take the Gherkin and literally copy it right out of the user stories and into Cucumber.js features and scenarios for example...or whatever framework you're using.

Story #1 Setup Initial OS X Local Developer Environment on Laptop

(btw, the "feature" is the overall story itself, it's the title above)

As a new Software Engineer
I need to setup an initial basic local development environment for OS X
So that I can start coding SomeFramework, AnotherFramework, etc.
(scenarios might "seem" overkill for this but adding them anyway to explain requirements for creating a local environment for starters)
Acceptance Criteria
(minimal possible setup, the following tests that we have things "working")
Scenario: Able to Run a NodeJS app
Given I have installed NodeJS
When In my favorite Code Editor (e.g. Webstorm)
Then I should be able to spin up a new Node app
Scenario: Able to Run ExpressJS and a web app
Given I have installed NodeJS and Express installed
When In my favorite Code Editor (e.g. Webstorm)
Then I should be able to run a website locally
Scenario: Able to Run Cucumber.js BDD Tests
Given I have installed NodeJS and Cucumber.js
When In my favorite Code Editor (e.g. Webstorm)
Then I should be able to create 1 BDD test (see the test fail (red) then make it pass (green))
Scenario: Able to Run Mocha TDD Tests
Given I have installed NodeJS and Mocha.js
When In my favorite Code Editor (e.g. Webstorm)
Then I should be able to create 1 TDD test (see the test fail (red), then make it pass (green))

As you can see, everything is very clear.  It's a no brainer, Gherkin is a great way to communicate all this; it makes sure it's short, and everyone will be happy, and it's something developers can run with and know they're doing what they're supposed to be doing.  And it also then guides us and truly gives us a precise starting point in our BDD code.  And we need this because the BDD code guides us down to the very first TDD tests we'll do in order to implement (complete) this story before passing it to QA for final integration tests & closure.

Here is another example


In this case, I don't really have scenarios or need any for this, so I just write the feature and that's it:

Story #2 Basic Documentation of OS X Local Development Environment Setup

As a new Software Engineer

I believe it would be helpful along the way to be document the setup
So that myself or anyone new or existing could get up to speed, learn, or save some time possibly
Note: Maybe some of it would be helpful in the future also if we ever created an OS X developer image for laptops?


And here is a story where I'll be spiking some code and later scrapping the code.


It'll only be used for some short-term temporary testing with some new automation tools we're proofing out...so since I'm spiking then will literally remove the code later on in our source control, there's no need to be doing BDD or TDD here...we do not plan to use it as a base for any code or use it in production:
(note that the italics below are to replace real words as to keep this generic for public viewing purposes)
Story #3 Simple NodeJS Web App Rendering Static Content
Feature: Simple NodeJS Web App Rendering Static Content
As an admin of SomeAutomationSystem
I want to have available a very lean NodeJS app running static content
So that the team can work on figuring out how to take that code and DoSomethingWithIt in SomeAutomationSystem 
Acceptance Criteria
Scenario: Web Page loads and shows static content
Given I run the NodeJS web application in the browser
When The page is done loading
Then I should see the the content "This is a Web Page Running on Node and Express"

So you can see how User Stories (features) coincides with BDD and how the Gherkin syntax is IMO the best way to be writing stories not only because it's clear, consistent, and concise, but because devs can straight up copy and start working with them in whatever BDD framework they are using that uses Gherkin, usually it's Cucumber.  I am using Cucumber.js.